源码:Handler、Looper、MessageQueue 初始化
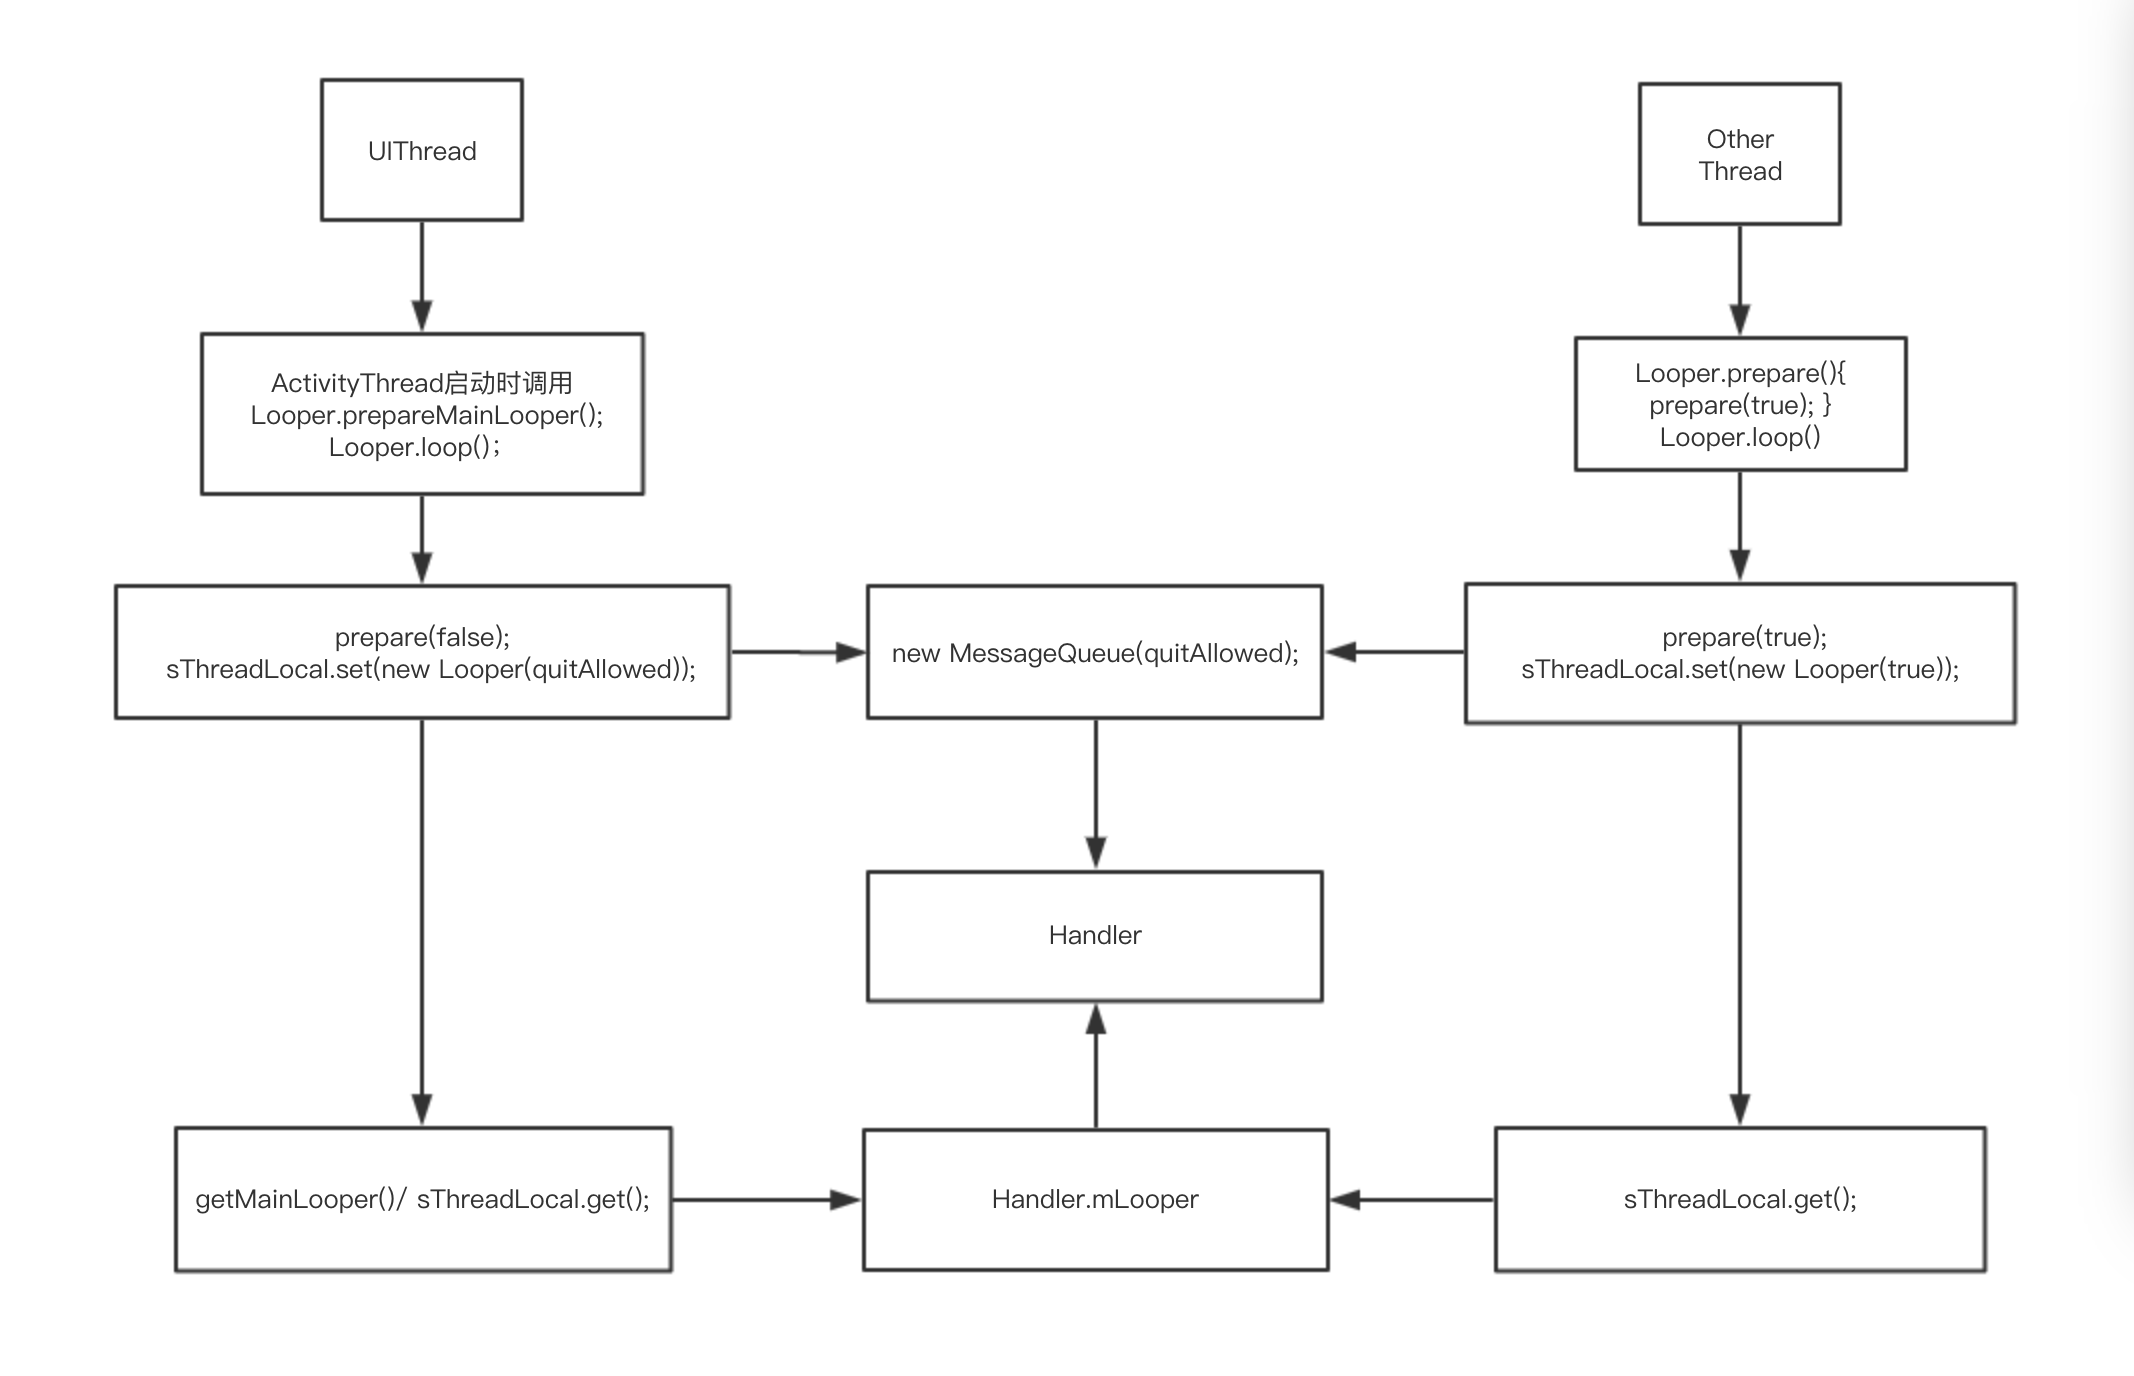
1.在 UI 线程创建 Handler,通常直接new Handler;
123456private Handler mHandler = new Handler() {@Overridepublic void handleMessage(Message msg) {super.handleMessage(msg);}}UI Thread 初始Handler化时 对Looper进行初始化过程, main()是在 UI Thread 启动时调用
12345678910111213141516171819202122232425262728293031323334public static void main(String[] args) {SamplingProfilerIntegration.start();CloseGuard.setEnabled(false);Environment.initForCurrentUser();EventLogger.setReporter(new EventLoggingReporter());Security.addProvider(new AndroidKeyStoreProvider());final File configDir = Environment.getUserConfigDirectory(UserHandle.myUserId());TrustedCertificateStore.setDefaultUserDirectory(configDir);Process.setArgV0("<pre-initialized>");Looper.prepareMainLooper();ActivityThread thread = new ActivityThread();thread.attach(false);if (sMainThreadHandler == null) {sMainThreadHandler = thread.getHandler();}if (false) {Looper.myLooper().setMessageLogging(newLogPrinter(Log.DEBUG, "ActivityThread"));}Looper.loop();throw new RuntimeException("Main thread loop unexpectedly exited");}查看一下代码,主要关注一下:Looper.prepareMainLooper();
1234567891011121314151617181920public static void prepareMainLooper() {prepare(false);synchronized (Looper.class) {if (sMainLooper != null) {throw new IllegalStateException("The main Looper has already been prepared.");}sMainLooper = myLooper();}}public static void prepare() {prepare(f);}private static void prepare(boolean quitAllowed) {if (sThreadLocal.get() != null) {throw new RuntimeException("Only one Looper may be created per thread");}_ sThreadLocal.set(new Looper(quitAllowed));_ }以上是UI Thread 初始化new Handler 调用过程
2.接下来看一下 Other Thread 初始化调用。
1234567Looper.prepare();private Handler mHandler = new Handler() {@Overridepublic void handleMessage(Message msg) {super.handleMessage(msg);}}查看下Looper.prepare();
12345678910public static void prepare() {prepare(true);}private static void prepare(boolean quitAllowed) {if (sThreadLocal.get() != null) {throw new RuntimeException("Only one Looper may be created per thread");}_ sThreadLocal.set(new Looper(quitAllowed));_ }
- 3.其他用法: 在其他地方需要用到Handler,并且需要刷新UI时,不通过Looper.prepare();调用,通过Looper.getMainLooper()也可以;
` Handler mHandler = new Handler(Looper.getMainLooper());

class Looper{
    public static Looper getMainLooper() {
        synchronized (Looper.class) {
            return sMainLooper;
        }
    }
} `
4.MessageQueue 初始化
1234private Looper(boolean quitAllowed) {mQueue = new MessageQueue(quitAllowed);mThread = Thread.currentThread();}Looper 在初始化时创建一个关联MessageQueue,一个线程中对应一个Looper & MessageQueue
Handler 初始化
123456789101112131415161718192021222324// 常用构造public Handler(Callback callback) {this(callback, false);}public Handler(Callback callback, boolean async) {if (FIND_POTENTIAL_LEAKS) {final Class<? extends Handler> klass = getClass();if ((klass.isAnonymousClass() || klass.isMemberClass() || klass.isLocalClass()) &&(klass.getModifiers() & Modifier.STATIC) == 0) {Log.w(TAG, "The following Handler class should be static or leaks might occur: " +klass.getCanonicalName());}}mLooper = Looper.myLooper();if (mLooper == null) {throw new RuntimeException("Can't create handler inside thread that has not called Looper.prepare()");}mQueue = mLooper.mQueue;mCallback = callback;mAsynchronous = async;}
从这里我们基本可以看到Handler 初始化时,关联了线程唯一的Looper & MessageQueue。
UI Thread 和 其他 Thread 初始完Looper和MessageQueue后,会调用Looper.loop(),来轮询分发消息。
5.梳理一下调用关系,来张流程图理解一下;
UI Thread:
ActivityThread.main() –>Looper.prepareMainLooper() –> prepare(false) –> new Looper(quitAllowed) –> new MessageQueue(quitAllowed)Other Thread:
prepare() –> prepare(true) –> new Looper(quitAllowed) –> new MessageQueue(quitAllowed)
异步消息
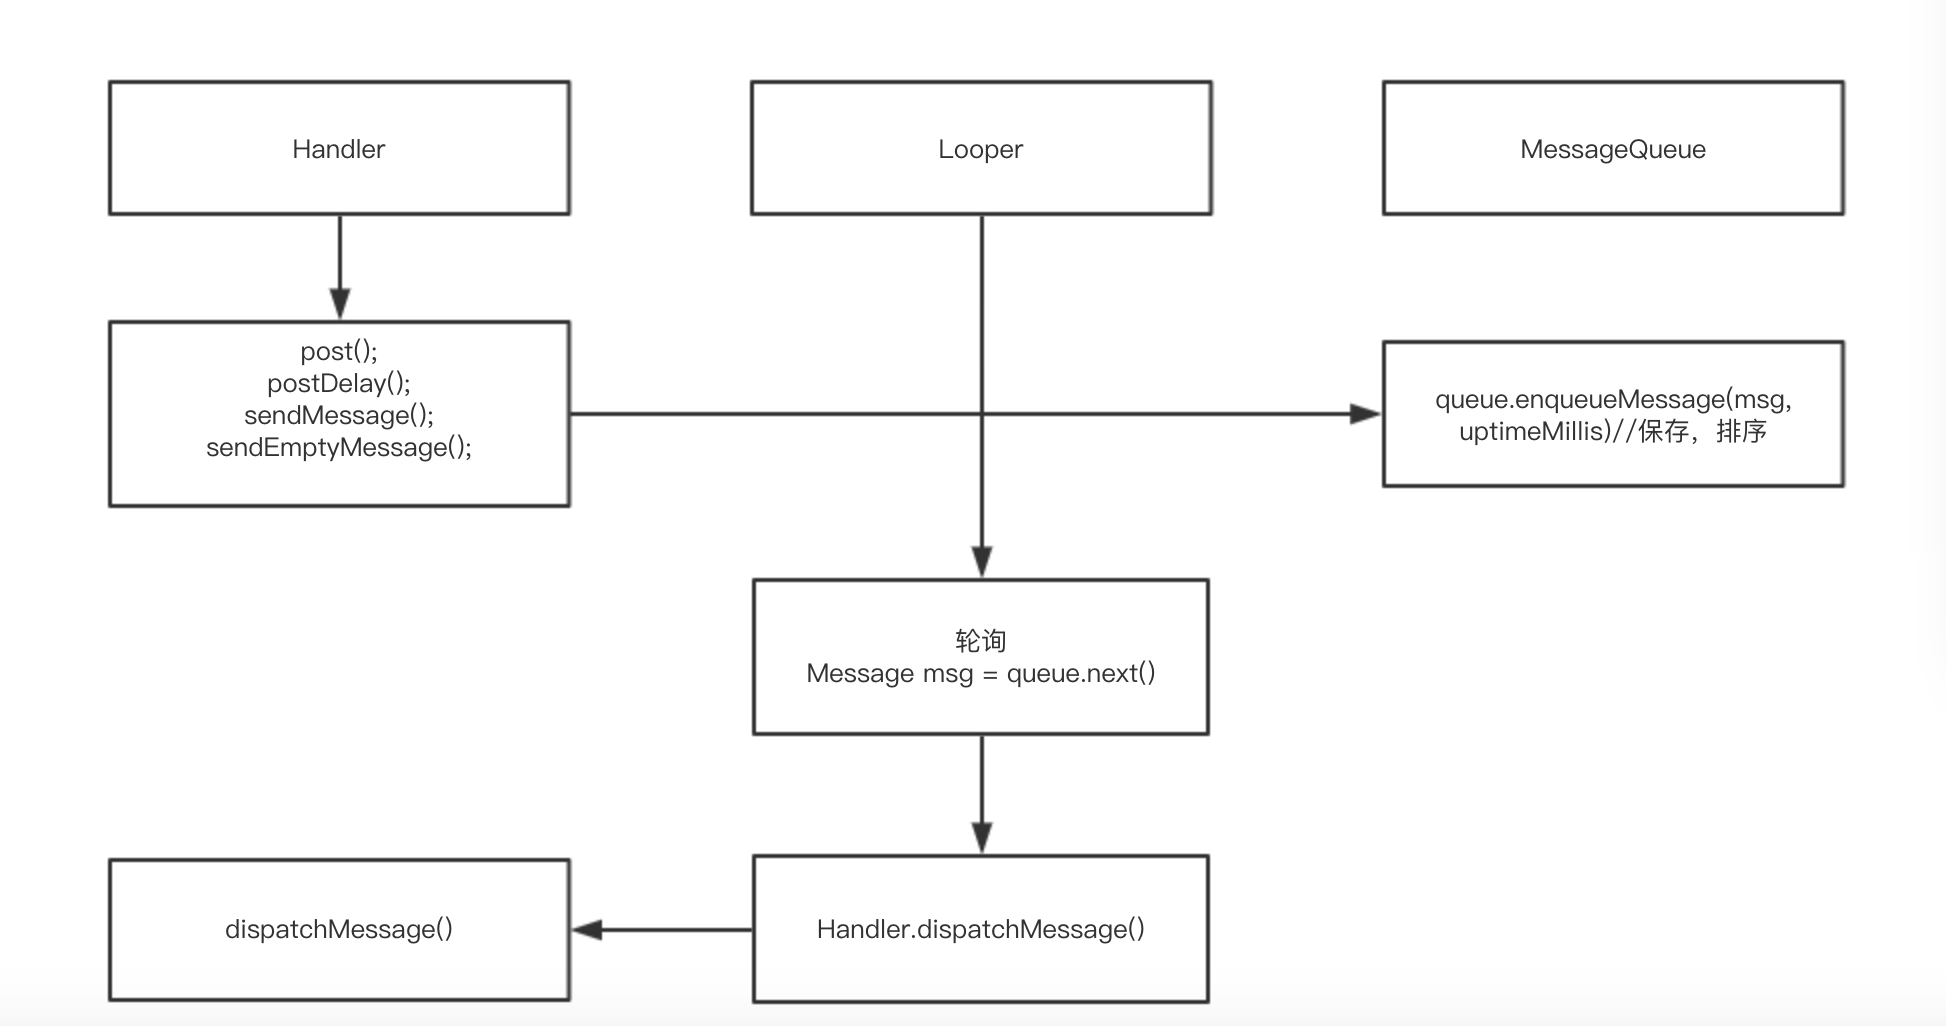
1.调用,存储消息
`
mHandler.sendMessage(new Message());
mHandler.post();
mHandler.postDelay();
    `
追踪一下不难发现,最后都走的一个地方
|
|
这样看msg.target = this;msg.target就是Handler自己,而MessageQueue就是Looper中关联的对象,而enqueueMessage()中是对message保存,进行Message.next()按时间排序。
- 2.消费
Looper.loop()是对MessageQueue的消费
|
|
看到loop()中,添加了一个死循环,不断去轮训MessageQueue中的队列是否为null,返回或者取出来继续执行 msg.target.dispatchMessage(msg);在最开始我们看到msg.target就是Handler本身
|
|
而handleMessage就是我们重写的回调方法。
postDelay是如何delay的?
MessageQueue 就是消息队列,即存放多条消息 Message 的容器,它采用的是单向链表数据结构,而非队列。它的 next() 指向链表的下一个 Message 元素。
从入队消息 enqueueMessage() 的实现来看,它的主要操作其实就是单链表的插入操作,这里就不做过多的解释了,我们可能应该更多的关心它的出队操作方法 next():
next() 方法其实很长,不过我们仅仅贴了极少的一部分,可以看到,里面不过是有一个 for (;;) 的无限循环,循环体内部调用了一个 nativePollOnce(long, int) 方法。这是一个 Native 方法,实际作用是通过 Native 层的 MessageQueue 阻塞当前调用栈线程 nextPollTimeoutMillis 毫秒的时间。
下面是 nextPollTimeoutMillis 取值的不同情况的阻塞表现:
- 1.小于 0,一直阻塞,直到被唤醒;
- 2.等于 0,不会阻塞;
- 3.大于 0,最长阻塞 nextPollTimeoutMillis 毫秒,期间如被唤醒会立即返回。
可以看到,最开始 nextPollTimeoutMillis 的初始化值是 0,所以不会阻塞,会直接去取 Message 对象,如果没有取到 Message 对象数据,则直接会把 nextPollTimeoutMillis 置为 -1,此时满足小于 0 的条件,会被一直阻塞,直到其他地方调用另外一个 Native 方法 nativeWake(long) 进行唤醒。如果取到值的话,会直接把得到的 Message 对象进行返回。
原来,nativeWake(long) 方法在前面的 MessageQueue#enqueueMessage 方法有个调用,调用时机是在 MessageQueue 入队消息的过程中。
现在已经知道:Handler 发送了 Message,消息用 MessageQueue 进行存储,使用 MessageQueue#enqueueMessage 方法进行入队,使用 MessageQueue#next 方法进行轮训消息。这就不免抛出了一个问题,MessageQueue#next 方法是谁调用的?没错,就是 Looper。
总结:
- 1.looper内的for不断去取MessageQueue 队列的数据
- 2.MessageQueue的 next() 不断拿消息时会读取delayTime来调用native做消息阻塞(主线程不会anr,说明这个native应该是个类似计时器的东西)
- 3.一张图梳理一下流程